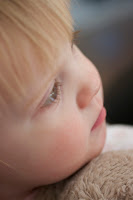
Bokeh or the art of a blurry background
OK there are plenty of tutorials,
articles and even Flikr groups dedicated to something called “Bokeh”.
Now I could write a blog post everyday for a month about all the
effects and equipment use to create different Bokeh, but I'll
refrain. I am going to concentrate on taking photographs where the
background is blurry, as we'd like the child to be in focus and
infact in these photographs we'd like just the child to be in focus.
This can be handy when there's something in the background that could distract from the subject of the photo, or perhaps the background isn't very attractive. We'll cover how to blur the background artificially when we look at photo modification applications.
It's not your camera that counts...
When you bought your DSLR camera
(Canon) it came with a bag, a strap and a lens. For 80% of the shots
you want to take with your camera this lens is perfect, for really
blurry background shots this lens isn't very good.
This is because the blurry effect is
due to the lens aperture, or quite simply how big I can make the
shutter aperture in the lens when I take the picture. In short the
lens attached to your camera is a tube of glass lenses with a black
circular shutter at one end (like the round twisty thing you see in
the James Bond movie posters). Now this shutter opens when you take
the photo – and depending on how easy it is for the light to reach
the photo depends on how detailed the photo is.
I've lost you. OK.
Small aperture – Lots of focus.
Large aperture – Lots of blur.
Aperture is measured in F on your
camera but is a result of your lens, turn your camera to AV mode and
twist the adjustment dial to it's lowest setting to see your lowest F
value. Alternatively look at the side of your lens – there are some
numbers – 80-150 f5.6. << It tells you it's lowest f value.
For those 'professional' shots where
only the lovely eyelash of the child or one side of the face is in
focus then you need a lens that lets you reach an aperture of about
1.8. However the shots in this blog were taken with a lens aperture
of 2.8.
Actually taking the photograph
So you have invested in a lens that
gives you an aperture of 2.8 or less. You've selected AV mode and
you're ready to go!
- Don't panic if you are looking through the view finder and it doesn't look all blurry in the background. The viewfinder can't always show you the effect of the low aperture setting – concentrate on the bit of the photo that you do want to be in focus.
- Use autofocus! Change your focusing mode to a single point if you are doing a close up head portrait shot or multiple points if you are taking a photo of the whole little one.
- If your shutter speed is 1/500 or more (1/250) then your shot will be perfect exposure (not to dark or light).
- If your shutter speed is 1/2500 then your shot will be over exposed and you need to drop the f setting to a few increments until it's 1/500.
Take lots of shots! One is bound
to be the one you want.
Head shots
So while her face is in focus, nothing else is!
Thankfully CBeebies provided a distraction and I had time to focus on her eyelashes to take this shot. We were still on the bar stools!

Body shots
This photo, my little blonde force of nature was running about on the green near our house. She's mostly in focus!
The photo to the right was taken in bright light –
I didn't notice the shutter speed was 1/2500 in the first shots
hence the over exposure).


No comments:
Post a Comment